
Friday, November 28, 2014
Food Photography tips
It seems like everyone is taking photographs of the yummy food they are eating at restaurants. Or at thanksgiving a photo of that beautiful turkey could be in your camera. You may just want to take a quick photo and email or put it on facebook. But why not make it something truly lovely. It doesn't take that much time to do it justice. Of course the most important element is the light. Always remember, "no direct sunlight". Try to have the light at your back or directed toward the food. If at all possible use natural lighting. Flash makes everything flat. The samples I'm going to show you are of cake but you'll get the idea. No. 1 is natural light. No. 2 is room light.
Monday, November 24, 2014
Gift wrap with photos
Wrapping gifts with photos is a fun way to give a present a unique look. Are you sick of the old boring wrapping paper? Try this easy technique. Just wrap with plain brown wrapping paper, cheap, and add a digital image to the top. This could be anything from a photo of the person to some beautiful landscaper. Then use plain old string and maybe some twigs or herbs. Voila a lovely personalized package. Here are some samples.

Thursday, November 20, 2014
Photos of strangers etiquette
Photos of strangers etiquette.
Usually we are taking photographs of people we know but when we are visiting exotic places there are many beautiful or unusual faces that we would like to record with our photographs. It is important to realize these people may not want their photograph taken. I always think of how I would feel if someone from, for instance, China was taking photos of my grandmother. This would feel invasive. And it would be. So keep that in mind. However there are places where you can pretty much take any photo you want. These are in markets. However it is still important to use the longest distance lens you have. Then you can stand way back and take that spontaneous photo. These are the best anyway. I try to move my camera around as though I am looking for something else. That way people don't feel they are the object. When I see that they have forgotten me, snap, I have a great photo. These photos of a Peruvian market are taken this way. My favorite is the pursed lips on the lady below. Look at those braids and the roses in her hat. What was her motivation of putting those roses there? Or the photo below that of the transaction. Looks like a 100 dollar bill that she is handing over. These are stories waiting to be told. That's photography, storytelling.


Friday, October 17, 2014
Photography without a tripod
Photography without a tripod:
1. Packing a tripod when you head off on holiday is a great way to extend the shooting day, allowing you to take some stunning night-time shots with streaking lights and illuminated landmarks. If you're pushed for space, though, check out this trick. Balance your camera somewhere sturdy and safe, disable the flash and set a slow shutter speed or two seconds or more. Now set your self timer, fire the shutter release and let go of your camera so that you won't cause it to wobble. By the time the self timer countdown expires, any residual movement caused by your hand letting go should have evened out, so your camera will sit still and steady throughout the exposure for a crisp, sharp result.
1. Packing a tripod when you head off on holiday is a great way to extend the shooting day, allowing you to take some stunning night-time shots with streaking lights and illuminated landmarks. If you're pushed for space, though, check out this trick. Balance your camera somewhere sturdy and safe, disable the flash and set a slow shutter speed or two seconds or more. Now set your self timer, fire the shutter release and let go of your camera so that you won't cause it to wobble. By the time the self timer countdown expires, any residual movement caused by your hand letting go should have evened out, so your camera will sit still and steady throughout the exposure for a crisp, sharp result.
2. It's not always possible to find a flat surface on which to perform the previous trick. Try and find a flat surface on some fence post and you'll see what we mean. Combat this by packing a small beanbag in your camera bag. Check out school sports and games categories on eBay to find little beanbags which can be pressed into shape on uneven surfaces, with your camera snugly settled on top. It's more stable and less likely to either fall over or wobble during the exposure.
3. Professional tripods use quarter-inch screws to fix your camera in place. You can easily source a screw of the same size from a normal hardware store. To avoid traveling with a bulky tripod, drill a hole in a standard bottle top (the type you'd find capping a drinks bottle) and thread the screw through it, fixing it in place using strong glue. Keep this in your camera bag as you travel, but don't bother carrying the rest of the bottle, as these are easily sourced wherever you happen to end up. Fill an empty bottle with grit to give it some weight and screw your cap to the top. Instant tripod.
Monday, September 22, 2014
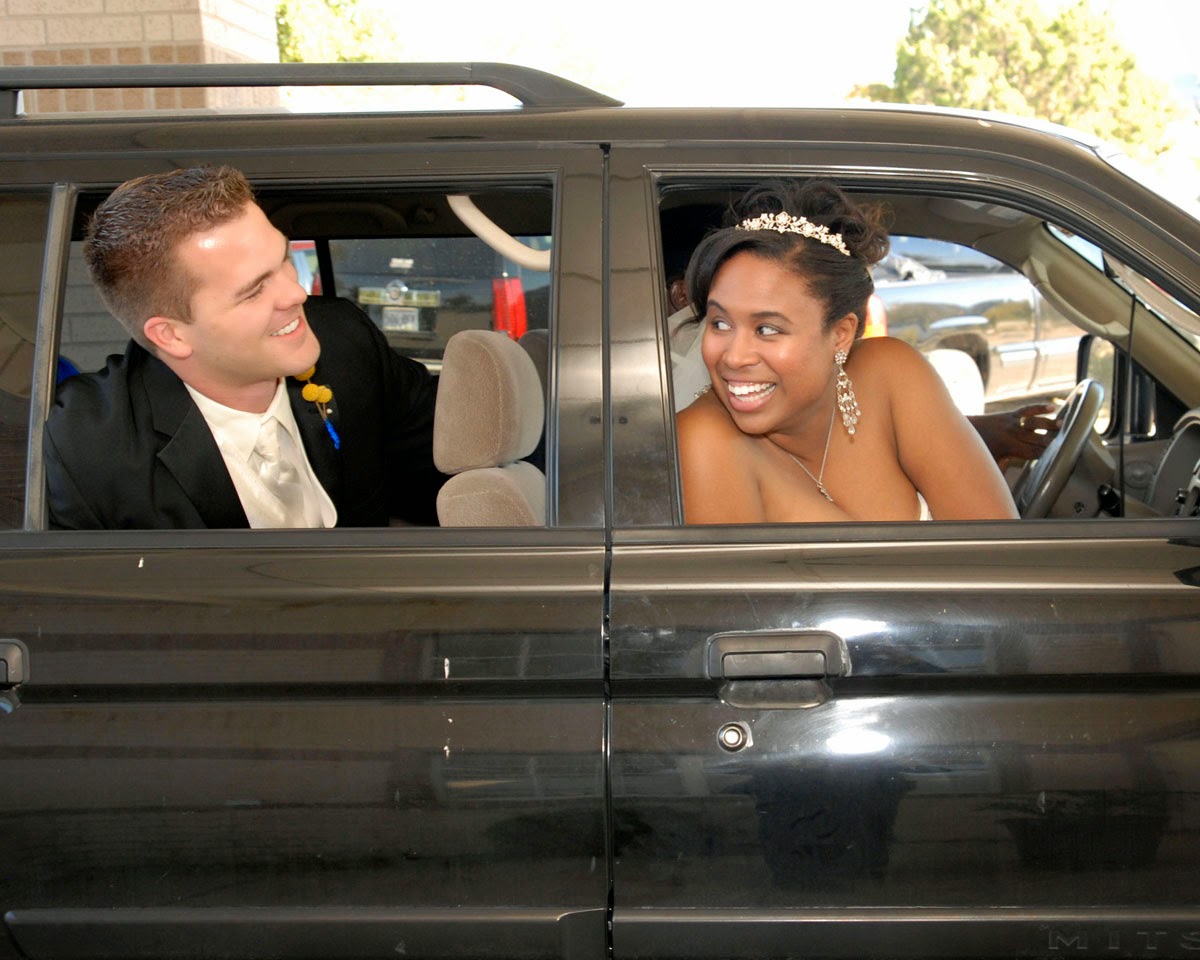
Choosing a wedding photographer
Choosing a wedding photographer. Planning a wedding is exciting and sometime exhausting. There are so many decisions to make. However one of the most important is choosing your wedding photographer. This will be the single most important vendor you will hire. All those memories, beautiful decorations and flowers etc will only be in your memory unless you have the photographs to remind you.
Wedding photography is some of the most difficult photography to undertake. Your photographer is shooting in a wide variety of conditions: dark church or event center, outside in daylight or night lights, portraits, group photos, photos of flowers and decorations, dancing photographs, action shots like tossing a bouquet, to name just a few. And of course you want everything to look spontaneous. And you have never done this before so how do you choose your wedding photographer? Here are some things to keep in mind.
Wedding photography is some of the most difficult photography to undertake. Your photographer is shooting in a wide variety of conditions: dark church or event center, outside in daylight or night lights, portraits, group photos, photos of flowers and decorations, dancing photographs, action shots like tossing a bouquet, to name just a few. And of course you want everything to look spontaneous. And you have never done this before so how do you choose your wedding photographer? Here are some things to keep in mind.
- Do they have experience? Someone right out of a university may know to operate a camera but wedding photography is about dealing with people. The camera is the easy part.
- Are they mature and easy to talk to? A wedding photographer will be dealing with grandma and your cousins baby and everyone in between. They need to be able to connect with people and get them to follow instructions in a kind manner. They can't be pushy or abrupt.
- Are the curious about what you want? You want a photographer that listens to you and does not come in with a preconceived idea about how the photos should be taken. They can suggest but you are the one to determine the style.
- Do they have a pleasing personality? You will be spending the day with your photographer. You need to like them. Hiring a pre-madonna or a social introvert, male or female, can create a miserable experience.
- Will they meet with you before the wedding? I really suggest that you start with a phone call, followed by a personal visit. Texting and emails give you information. But you are dealing with a person. You need to talk to them and meet them.
- Do they have samples for you to look at? This may seem obvious but albums and photographs tell you a lot about the photographers style.
- Do their sample images have variety? This relates to the last question. Look at the group photos and the photos of the couple. Do they look natural and happy or stilted? Expression says a lot.
- How do they do their pricing? Many couples ask immediately "what will it cost?" Of course you want to know if you can afford the photographer but pricing has lots of variability. If the photographer has only set packages, beware. I always work with a couple to create what they actually need not what they "think" they want. Most pricing is about time: more time more cost. Unless you have a huge budget you do not need a professional photographer for hours and hours or the entire wedding start to finish. For instance your reception may be 4 - 5 hours long or more. Think about it: How many dancing shots do you want? Generally people want the following: getting ready photos, ceremony, portraits of couple and family, exiting or entering the church or reception, cutting the cake, toasts, the first dance. father/daughter, son/mother dance and party photos like bouquet toss. For most weddings the can all be done in 3 - 4 hours sometimes less. You don't need 100 photos of your friends dancing and drinking. A few will do.
If you use these guidelines for choosing your wedding photographer you will be well on your way to having wonderful photographic memories of you wedding. Give me a call if you would like to discuss this more. And look at the samples on this website under the "wedding" heading. Charlotte 512 447 2150
Friday, September 19, 2014
One Window light
Some of the most beautiful photographs use only one window light. Seems simple and in many ways it is. However you do need to train your eye to see correctly and understand the light source. Here are some samples.
This works so well when photographing women. You can almost feel the softness of their skin. There is an interplay between light, the angle of light, the type of light being used, and size of light. all combined with the pose, angle of pose and all things “posed”….
To begin place your subject close to the window and see how the light hits her skin. Make sure there are no sharp shadows. You want to place your subject in a window where there is no direct sunlight only diffused. Try it out. You'll love the results.
See samples of this technique on my blog. http://charlottebell.com/blog-page/
Saturday, September 13, 2014
Headshot photography tips
A professional head shot is necessary for every business. Some people say put your best "foot forward" I would say put your best "face forward". We have all seen a business card or website where the photo of the person a awful. I always wonder why that person thought a bad photo would increase people seeking their product or services. So here are some headshot photography tips. By the way you can do this yourself with a friend. First, wear clothing you generally would wear to work. Then...
1. LIGHTING: The most important element. I would suggest you take the photo outside. Find a place where your face is in the shade but the sun is at the photographers back. You want your face properly lit.
2. BACKGROUND: Use a simple background. This could be poster board or a stone wall. Remember this is just your head from the top of the shoulders up. Do not stand too close to the back ground.
3. POSITION: Stand your body at a 45 degree angle to the camera. Then rotate your face toward the camera. Make sure your shoulders are back. No slouching.
4. HEIGHT: Have your friend stand a little above where you are. This is especially helpful if you have a double thick chin.
5. NUMBER: Take lots of photos. Have fun. Don't hold a smile. Keep it spontaneous. Try some with smiles some without a smile. Think pleasant thoughts. It shows on your face.
After you take 20 or 30 shots look at them and learn. You can then do it again. You may find that there is a particular expression you like. Try to repeat this look the second time around. Now you have a photo you can be proud of to place on your website, facebook, linkedin or business cards.
Monday, September 8, 2014
Dull looking photographs
Do you photographs sometimes look dull and lifeless? Maybe you shot the photo during a grey day. The lightness and shadow overall is great but the image lacks punch. There is an easy fix to this. Try shifting the color and the contrast. Just by adding yellow to your photograph you can see the entire image come to life. Then if you up the contrast the images will really start to pop. Try it on one of those gray photos and see what happens.
Monday, August 4, 2014
Changing the size of a photograph
We are going forward with more photoshop tips.
One of the most common errors people do is in changing the size of a photograph. In photoshop you will see a heading at the top that says IMAGE. Under this is a heading, IMAGE SIZE. You could think that all you need to do to change the size of your photo from a 4 x 5 to an 8 x 10 is to write in the larger number. Or change the resolution from 72 to 300. Not true. The correct way to do this so your images maintain their clarity is to do the following: By the way always take your photos at the highest setting your camera will allow.
One of the most common errors people do is in changing the size of a photograph. In photoshop you will see a heading at the top that says IMAGE. Under this is a heading, IMAGE SIZE. You could think that all you need to do to change the size of your photo from a 4 x 5 to an 8 x 10 is to write in the larger number. Or change the resolution from 72 to 300. Not true. The correct way to do this so your images maintain their clarity is to do the following: By the way always take your photos at the highest setting your camera will allow.
Here is how to enlarge a photo:
1. Go to IMAGE at the top of photoshop
2. Go to image size.
3. Note there are 2 headings. Pixel dimensions and Document size:
4. You want to change the Document size. First check the Resolution. For good printing this should be 300 DPI. However don't do this without the following step.
5. Note the bar and link sign between width and height. Now check the box at the bottom that says. resample image. Now all three options are connected: width, height and resolution. Now you can change the resolution to 300. It will altar the width and height as well.
6. Now uncheck the box to seal the deal.
Did you see how the inches of your photograph changed when you put in 300 dpi? This is because there is a relationship to the size of the photograph to the resolution. If you were to just change the resolution the quality of the image would be affected. By linking them as you change the resolution your photo maintains it's quality.
Now you can print a quality image.
Wednesday, July 2, 2014
How to lighten or darken an image in photoshop
This is probably one of the most common procedures you will do. Often times when you take photos with your camera’s Automatic mode, the images might come out too dark or too bright. Thanks to digital photography it’s pretty easy to learn how to lighten dark photos in Photoshop. The easiest way to adjust for dark and light is to use the tool. LEVELS.
You can find this in photoshop in 2 places.
1. Top bar: image/adjustments/levels
2. Bottom right under layers, Find the tools at the bottom of that heading, then find the circle in the middle with light and dark divide.
Under this circle are lots of options. Click on LEVELS, you will see a little mountain, called a histogram. This is the distribution of light to dark. There are little arrow and sliders under the mountain. The ones we will be using are the arrows on the right (lighter) and left (darker). By just sliding these arrow toward the middle you will change the light and dark of your photo. To have a properly adjusted photo you want the foot of the mountain to go all the way to the left and right. If you move your slider into the actual black part of the mountain it can distort your balance. Sometimes this is ok especially if you have a bright white sky. Experiment with this see what you like.
In fact I suggest you pay with all the headings everywhere. Just play with them to see what they do.
A very fun place to play is on the top bar under filters. These options will make some pretty amazing things happen to your photo. Photoshop is like a big toy. Play.
A very fun place to play is on the top bar under filters. These options will make some pretty amazing things happen to your photo. Photoshop is like a big toy. Play.
Tuesday, June 24, 2014
Organizing Photographs
LET'S GET ORGANIZED
I imagine many of you already have a mass of photographs all over your computer, no problem.
Here's is how to start. START TODAY.
1. Make a folder on your computer called PHOTOGRAPHS. Then think of what you mostly take photos of, family, nature, trips, etc.
2. Make subfolders in the PHOTOGRAPHS folder with these headings. Make them very broad so you only have 5 or 6 subfolders at the most. Don't worry if you can't decide where something goes. Your photos can go in more then one folder. EX. You can put the photos of your son in his own folder and in the folder of the trip to Cancun.
HOW TO DEAL WITH ALL THE UNORGANIZED PHOTOS: In each of the 5 - 6 subfolders make another folder called "to Organize" put all your unorganized photos from that theme in that folder. You can just dump in all the photos of your trips, family, art photos etc in this folder. Then while you're watching TV or something little by little you can put them where they belong.
NOW MOST IMPORTANT: Every time you download photos from you camera make subfolders under the main themes and put those new photos there. Here are two sample of a structures that will probably work for lots of people. This second one will seem daunting however this is what you're working towards.
SAMPLE ONE : Simple start (do this today)
PHOTOGRAPHS
Travel
to organize
Family
to organize
Nature
to organize
SAMPLE TWO: This is your goal. Check my blog. http://charlottebell.com/blog-page/
Thursday, June 19, 2014
Photoshop for digital photographers
We have covered many details for improving your photographs in this blog. You should have a pretty good idea by now how to approach photography so you are consistently taking great photographs. However you have to deal with them once they are out of your camera. How to you print, enlarge, edit, crop, alter, add filters, erase blemishes and a thousand other details you need to know to make you photos truly great. So I am going to shift the focus to editing your photographs. The program I am going to suggest is photoshop. You may say. That's really expensive. Well things have changed. Go to the adobe site and check it out. https://creative.adobe.com/plans?store_code=us. You can now just get the program for as little as 9.99 a month. So why not? Of course now you have to learn how to use it and that is what this blog will be about.
We will start with the basics, organizing. You have got to have a system in your computer. I cannot emphasize this enough. Once you have a system in place you can always find that wonderful landscape you took in Italy in 2012. Or those family photos for Christmas last year. So stay tuned. This is going to be fun. Photoshop to me is like a big toy. Once you know how it's organized you will have countless hours of productive fun. We'll start tomorrow. Stay tuned.
Wednesday, June 18, 2014
Creating depth and shape in photography
Wednesday, June 11, 2014
Candid photographs
Many people hate having their photograph taken. They liken it to going to the dentist. So first I try to put people at ease especially if is a portrait or head shot. They have to look at the camera. I tell them this is the digital age we can take as many photos as we like, so relax. Then I start to talk to them about their family, kids, job or stuff they like to do. Suddenly they become relaxed. I may try to sneek a couple photos while their talking, this can work but the main idea is they have stopped thinking about “smiling” and they are just themselves. Now when I have them look at the camera again they are much more at ease.
However for family, friends and wedding it’s great for people to be involved in activities they like. I will put on my long lens so they are not so aware of my presence. Then I just keep “catching the moment”. Usually the best photos are the ones were they are observing one another.
Monday, June 9, 2014
The unusual in photographs
Move your photographic subjects out of their comfort zone. Or how about encouraging people to get silly like in these wedding photography samples. Some people will think it's dumb but most folks like to ham it up and just need a little encouragement. These photographs sure make the wedding album more fun.
This can be the back ground or having your subject do something entirely new and unexpected. 


Wednesday, June 4, 2014
A Unique wedding experience
Sometimes people are just too unique not to share their experience. This couple is traveling around the country to visit friends and family and at each location they have a ceremony and reception. I was lucky enough to do their photography in Austin TX. This was wedding no. 3. While you view this video think about some of the photographic hints we have been talking about. To me what I loved about photographing them was their spontaneity. They were so expressive it was easy, well sort of, you have to be on your toes all the time to catch these moments. This is what experience does. You can anticipate what's coming and get that photo the second it happens.
Thursday, May 29, 2014
Eyes, where is your subject looking?
The direction of your subject’s eyes are looking in can impact an amazing impact on your photograph. Most portraits have the subject looking directly at the camera. This gives you a sense that they are connecting with the viewer which is great, But if you want to create something unique and different try this.
Have your subject look at something outside the view of the camera. There is something intriguing in this pose. The viewer wonders what they are looking at. Now if you add some kind emotion: laughter or surprise or a pensive look the photograph becomes even more interesting.
Another technique would be to have them look within the frame. This works very well with two or more people. Have them look at each other. Frequently this results in laughter or a kiss or something completely unexpected. Be ready to capture what ever happens after they look at each other too. Keep shooting. 


Tuesday, May 27, 2014
High ISO for photography
For those of you that are following this blog and trying out manual you may be afraid to up the ISO on your photos? I routinely shoot high ISO for many shoots, especially in the evening. Now, when shooting weddings and families I try to keep the ISO no higher than 800. If I need go higher for these circumstances I use flash. But if at all possible I like natural light. If there's noise, I live with it. It adds warmth and a mild texture. Or I can process in photoshop and take out the noise. This will leave a softer image but again many times when the light is low you are looking for a dreamy image anyway. Better to capture the moment that will never pass our way again. Experiment.
Wednesday, May 21, 2014
Using window light for photography
When I think of window light I think of Verneer. This luscious light was the first light source most photographers used when creating their indoor portraits. It was free, easy to use, and in most cases a nice soft pleasing light source.With just one window, you can create a series of different portraits that are quick, unique and easy. I like to use a reflector along with the window light; this makes it easy to lighten up the shadows and get some big catch lights in the eyes. When using a window as your main light source I typically have my subject at a 45 degree angle while I stand parallel to the window. I will then bring in one of my large reflectors on the opposite of the window to lighten up the shadow side of the face caused by the window light. This will give that nice soft lighting transition from the high light to the shadow side of my subject. The window was facing South, so the window light coming through was rather harsh to what I would normally use. An easy fix for this was to pin up a white thin bed sheet I brought for just this problem. The bed sheet softened the light but it also reduced the “amount” of light coming through the window so I had to tripod my camera as the shutter speed was to slow to handhold. With weddings when I am at the brides home I like to use the same window light setup if I can to create some beautiful bridal portraits. I will normally just use the walls of the homes as the background and the furniture that is in the room as my props. I use window light to photograph my brides, babies, business portraits, food, products, families and on and on. Remember to always look at your surroundings on the opposite of your subject (the opposite side of the window), and make sure there is enough light for your exposure.
Saturday, May 17, 2014
White balance and photography
This is one of the most important and underused settings on modern cameras. Here is what is happening: the human eye automatically compensates for different kinds of lighting; white looks white to us in almost any lighting. A digital camera compensates for this by shifting the colors certain ways. For example, under tungsten (incandescent) lighting, it will shift the colors towards blue to compensate for the redness of this lighting. Learn how to set it, and what the various settings mean. If you are not under artificial light, the "Shade" (or "Cloudy") setting is a good bet in most circumstances; it makes for very warm-looking colors. If it comes out too red, it's very easy to correct it in software later on. "Auto", the default for most cameras, sometimes does a good job, but also sometimes results in colors which are a little too cold.
Tuesday, May 13, 2014
Inclement Weather photography
We always think that we want a clear bright day for photography. Well, maybe not. Whenever I see an overcast day for photography I smile. The sky is like a great big soft box making all the light even and beautiful. There are no nasty shadows or bright spots. Everything has great lighting. You may need to add some flash to give the photo some pop but this is not necessary. But still remember the sun is up there somewhere. Pay attention so your subject has the filtered sunlight on them. That means the sun is at your back.
Now how about rain? Some of the most amazing photos are taken in between rain drops when the street or grass is full of reflection. This can be particularly lovely at night with some city lights reflecting on a shiny street. Endless possibilities for creativity.
Monday, May 12, 2014
Taking Group photos
"Ducks in a row" You have probably seen a million of this type of photo. Everyone is lined up. While this may be cute if you can find ducks doing this, for people this gets pretty boring. Here are some suggestions.
Look for a prop: sofa, chairs, swing, tree, car. Basically you want something to arrange your group around or to break up the monotony.
Have the people strike different poses: some standing, some sitting, have bodies turning in different directions, some leaning or holding on to something
Try to create two or three different mini groups within the big group, triangles work well, and some can be by themselves.
Use a plain background that doesn't distract from the group. Even a forest in the background will appear plain, a brick wall.
I always like to end a group session by asking people to cheer or act goofy in some way.
Make sure you can see everyones face. Have people move around so you can see all faces.
If you are using flash make sure the range of your flash is correct to light everyone.
If it is a really big group it can be too time consuming to do get too creative but consider having the people in the front row doing the above and people behind can be lined up. 


Saturday, May 10, 2014
Using Fill Flash for daytime photography
In many circumstances you can use your flash in the day time. Let's say you taking a photograph of someone sitting on a dock with the sun behind them. You either have the water well lit and the person dark or the person well lit and the water blown out. What to do? Turn on your flash. If you are shooting in manual, I hope, make your setting correct for the water and then turn on the flash. Voila the person is lit and the water is also beautiful. This can create some dramatic effects as well. This can also help with photos of people in dappled light, for instance under a tree. I prefer to have them move to a shaded spot but if you have no choice turn on your flash and that will help fill in the dark areas. Play with it.
Wednesday, May 7, 2014
Inspiration for photography
Look everywhere for inspiration: online, and in books and magazines. But not passively. Look at different styles. Look at where the light is coming from. Look at the technical elements of pictures and think about how they were made, and what the photographer is trying to say. Work out what you like or don’t like about them. The more you take in, the more ideas you’ll have when creating your own work. Remember photography is light.
Tuesday, May 6, 2014
How to hold your camera
Sounds pretty elementary but holding your camera correctly can help you get better photos.
You might not know it, but there is a right way and a wrong way to hold a DSLR camera. The correct way is to support the lens by cupping your hand underneath it. This is usually done with the left hand, with your right hand gripping the body of the camera. This helps to prevent camera shake. If you are gripping your camera with your hands on either side of the camera body, there is nothing supporting the lens, and you might end up with blurry photos. To get an even stabler stance, tuck your elbows into the side of your body.
It you have a small point and shoot or are using your phone the trick is to be very still. Try holding your breath when you touch the trigger. Always take more then one.
Wednesday, April 30, 2014
Be a part of the photographic community
Almost every town of any size has photographic groups in them. Here in Austin, TX we have a whole bunch at "http://www.meetup.com/". If you haven't discovered this site it may be worth while to check it out. Meetup.com is one of the lesser discussed social networking sites, but I'd argue it's one of the most valuable in terms of bringing people together in the real world around a common theme or interest -- going beyond Facebook and Twitter to facilitate real-life interaction where so much of our communication is digital. You can "meetup" over all kinds of themes from wine tasting to rock climbing. And there a lots of photographic groups. Frequently they have a day or evening gathering about a particular subject. It's fun and you can learn from others.
Another place to gain knowledge is at a photographic store. Many of these will offer classes. In Austin the best store is Precision Camera. http://www.precision-camera.com/
This rather amazing store has lots of classes plus you can just go in and wander about. The sales people are very knowledgeable and will answer questions as well.
By reaching out you will find out things that you never even knew you didn't know.
Tuesday, April 22, 2014
Backgrounds in Photography
Have you ever taken a great photo of someone only to have a nasty background like a fast food sign or power lines? So you know what I'm talking about. Look around before you take the photography. You can move your subject to a location that is much more pleasant. This could even be the brick wall on the side of that same restaurant. While you're at it put them in the shade. There is nothing more distracting than mottled sunlight on someones face or body. All you need to do is place them under a tree or on the shady side of a building and voila a great photo. Remember to get in close and take more then one shot. You'll be amazed.
Thursday, April 17, 2014
Photography of Religious events
I am presently in San Miguel de Allende Mexico for my yearly lecture slide show: The Guide to Semana Santa. The lecture is created from my book “Tears from the crown of Thorns”. It is designed to help the visitor understand the significance of the processions and to learn how to navigate the myriad of events.
I am, of course, taking more photos. It has been an interesting time.
Taking photos of religious events involves sensitivity. Many people do not appreciate people taking photos of their spiritual processes. However these are important to document and if you photography with respect there should be no problem.
Here are my suggestions:
1. Do not use flash
2. Do not get in participants faces with your camera. Never.
3. Scope out the scene before hand to determine the best place to stand for sun, shade, good background and drama.
4. Get to the event early stand at the spot you choose and use a telephoto lens.
I did my entire book this way and the photos are pretty extraordinary.
Here are some of the images from this year. I will be adding more images in the next few days..jpg)
.jpg)
.jpg)
.jpg)
.jpg)
.jpg)
.jpg)
.jpg)
.jpg)
.jpg)
.jpg)
.jpg)
.jpg)
.jpg)
.jpg)
.jpg)
.jpg)
.jpg)
.jpg)
.jpg)
.jpg)
.jpg)
Monday, April 14, 2014
Perspective and the rule of thirds
Do your photographs seem predictable? Do you always shoot from your own personal height? Well, this is an easy remedy, change perspective. Try squatting down or even lying on the ground. Try holding a camera at an angle. These can all give dramatic effects and certainly will make your photography more interesting.
Rule of THIRDS
This is actually a concept from painters and great artists. This means dividing you photograph into 9 equal boxes, 3 across and 3 down. You can actually do this on your editing program with a photo you have already taken. The basic idea is your subject is more interesting if it sits on one of these lines. That means asymmetry. Look at the painting of the masters you will see time and time again that the subject is off center. Also the horizon line needs to follow one of these lines. Try it. You will be amazed at how much more interesting and professional you photos look. Of course there are times when you want to have your subject front and center but start to think this way when you look through your viewfinder. It will take practice but you will like the results.
Friday, April 11, 2014
Natural looking portraits.
If you are taking photos of people, engage and talk to them. Use your eyes – lower that camera and be human. Bring the camera up for a decisive shot. But remember to lower it, like you’re coming up for air, to check in with your subject. Chances are they are family or friends so joke around. You want natural looking photos. So make some dumb jokes and get them to loosen up. There are way too many photos of people with the phony smile. Also try to take photos while people are just talking. After a while they forget you are there and you can get some gorgeous images. Then you can just delete the ones that don't work.
Thursday, April 10, 2014
Photographic books and learning
There is so much equipment out there to purchase. You could spend a fortune. However I suggest you purchase more books then equipment. When you really understand how light and your camera work you do not need a lot of extra stuff. Plus many books will show you how you can use common everyday things as photographic accessories. Later we will talk about diffusers and reflectors but as an example instead of buying these you can use a sheet for a diffuser or a piece of cardboard for a reflector. Also check out photo magazines. Rangefinder is free and has an on-line magazine as well. http://www.rangefinderonline.com/index.shtml
One of my favorite authors is Scott Kelby. His books are task oriented with lots of illustrations. And he's kind of fun. He also has an amazing teaching site: http://kelbyone.com/ There is a slight charge (first month is free) but once you start checking out his lessons you will be hooked.
The more you read and watch the more interesting photography is going to be. The possibilities are endless.
Also if you really want to get the full treatment attend a conference. In Texas there is an amazing event every May. http://tppa.org/ It says it's for professionals but there are lots of wanabees.
Have fun learning.
Tuesday, April 8, 2014
Ask permission before taking photos of strangers
Ask permission
When photographing people, especially while in countries with different cultures and languages, it can be hard to communicate. In certain countries if you photograph someone you are not ‘supposed’ to photograph, it can get ugly and it can be insulting. So out of respect you should always ask permission. ??I think of it this way. You see this interesting face of an elder person, great wrinkles and expression. Now think of this as your grandmother. Would you want some stranger from another country snapping photographs of her? You get the idea,
I will be heading to Mexico on Thursday for Semana Santa, Holy week. http://charlottebell.com/tears-from-the-crown-of-thorns/
This is the most important religious event of the year in MX. There are two major processions on Holy Friday. I have been so embarrassed in the past to see some idiot jumping in front of the casket of Jesus and snapping flash photos in the face of the mourners. Talk about the ugly American. Be very respectful in other countries. Ask at your hotel about customs for photography.
Sunday, April 6, 2014
How to avoid red eye.
Nothing is more weird then "red eye" on your photo.
Why is this happening? Believe it of not it's the flash. The pupil of the eye dilates with that bright light. So you are seeing the blood vessels from the back of the eye. Here are some hintspurchase a simple device that will soften the flash a "flash difuser" Do a google search using that term and you will find many devices in all price ranges. Not only will this avoid red eye but your flash images will have a much softer light.
Ask your subjects to look just to the side or above the camera
Use red eye reduction on your camera setting
But the easiest is to purchase a simple device that will soften the flash a "flash difFuser" Do a google search using that term and you will find many devices in all price ranges. Not only will this avoid red eye but your flash images will have a much softer light.
.
Saturday, April 5, 2014
Avoiding Blurry photos
The easiest way to avoid blur is to use a tripod. This is especially important if the light is low, as in night or late afternoon photography. Your shutter is going to open more slowly to allow in more light. This slow shutter is the cause of the blur. You cannot hand hold a camera with a shutter speed less then 30. You can try holding the camera close to your body and bracing yourself or the camera against a solid object like a wall or fence but this is chancy at best. Here is when ISO is very helpful. The higher your ISO the faster you shutter speed can be. Remember shutter speed, ISO and aperture all work together. So when it’s dark I first crank up the ISO open up my aperture put the camera on a tripod and I will have wonderful results. Here are some examples.


Thursday, April 3, 2014
Light and photography
Does all this seem confusing? The reason why it’s so confusing, is, it’s so simple. Really. It is. We complicate matters. Think about a great blues solo. Simple. The worlds best bands- often using three chords, no more. Simple. The best images in photography are often very, very simple use of light.The key here is to learn how to use it, simply. Use it to bring out results, to elicit a feeling, a mood and paint a picture. What we need to learn is to see light. There is always a light source and that is the key. Look at how the light is reflecting on the face. Just turning you subject will change everything. Experiment. It's digital.
Tuesday, April 1, 2014
The big three
Balance in ISO, shutter speed, and aperture. ISO is how sensitive your camera is to light, shutter speed is how long it takes for your camera to take a picture (which in turn alters the amount of light coming in), and aperture is how dilated the lens of your camera is. Not all cameras have this, mostly only digital photography cameras. By balancing these and keeping them as close to the middle as possible, you can avoid the noise caused by high ISO, the blurriness caused by low shutter speed, and the depth of field side effects caused by low aperture. Depending on how your picture should be, you should change these settings accordingly to keep light at a good level but still have the effects you want on your picture. For example, say you are taking a picture of a cool bird coming out of the water. You will need a high shutter speed to get it in focus, but you will also need a low aperture or high ISO to compensate for the lighting. A high ISO will make it look grainy, but a low aperture is perfect because it also creates a cool blurry background effect that draws attention to the bird. By balancing these elements, you can make the best image possible.
Friday, March 28, 2014
Tips continued
Fill the frame with your subject. Do not be afraid to get closer to your subject. On the other hand, if you are using a digital camera with plenty of megapixels to spare, you can crop it later in software.
Try an interesting angle. Instead of shooting the object straight on, try looking down to the object, or crouching and looking up. Pick an angle that shows maximum color and minimum shadow. To make objects appear longer or taller, a low angle can help. You may also want to make the object look smaller or make it look like you’re hovering over; to get the effect you should put the camera above the object. An uncommon angle makes for a more interesting shot.
Focus. Poor focusing is one of the most common ways that photographs are ruined. Use the automatic focus of your camera, if you have it; usually, this is done by half-pressing the shutter button. Use the “macro” mode of your camera for close-up shots. Don’t focus manually unless your auto-focus is having issues; as with metering, automatic focus usually does a far better job of focusing than you can.
Next time we will talk about the technical stuff. ISO aperture and shutter speed.
Thursday, March 27, 2014
Organizing your photographs
You want to take beautiful photographs correct? Organizing your photos is not high on the list. However before you know it you will have hundreds and hundreds of photos and how will you find any of them? Create a system NOW. Even if you are swamped with photos already. There are many systems you can use. I like to start with general headings. EX. nature, family, vacations, events etc. Then I have under each of these subheadings by the year. If this is all you do you will be ahead of the game. But the more subheading you have the easier it will be to find that one special photo you took in 2012 of your grandmother.
Even if you are sitting in a photographic mess at this moment create your system and put all your future photos into these categories. Then little by little you can sort through the uncategorized photos and put them into your system. Before you know if everything will be in order and available. Remember while you are doing this edit edit edit. Only keep the best. Then when you look back at your work you will see where you have been and the progress you have made. Start today.
Wednesday, March 26, 2014
Photographic tips continued
Compose your shot thoughtfully. Frame the photo in your mind before framing it in the viewfinder. Consider the following rules, but especially the last one:
Use the Rule of Thirds, where the primary points of interest in your scene sits along "third" lines. Try not to let any horizon or other lines "cut the picture in half."
Get rid of distracting backgrounds and clutter. Move positions to avoid trees looking like they are growing out of heads, when they are in the background. Change angles to avoid window glares from across the street. If you are taking vacation photographs, take a moment to get your family to put down all the junk they may be carrying around with them and to remove backpacks or hip packs as well. Keep that mess well out of the frame of the picture, and you will end with much nicer, less cluttered photos.
Ignore the advice above. Regard the above as laws, which work much of the time but are always subject to judicious interpretation — and not as absolute rules. Too close an adherence to them will lead to boring photographs. For example, clutter and sharply focused backgrounds can add context, contrast, and colour; perfect symmetry in a shot can be dramatic, and so on. Every rule can and should be broken for artistic effect at times. This is how many stunning photographs are made.
Fill the frame with your subject. Do not be afraid to get closer to your subject. On the other hand, if you are using a digital camera with plenty of megapixels to spare, you can crop it later in software.
Tuesday, March 25, 2014
More tips for taking photographs
Take your camera everywhere. When you have a camera with you, you will start to see the world differently; you will look for and find opportunities to take great photographs. Because of this, you will end taking more photographs; and the more you take, the better a photographer you will become. Furthermore, if you’re taking photographs of your friends and family, they will get used to you having your camera with you all the time. Thus, they will feel less awkward or intimidated when you get your camera out; this will lead to more natural-looking, less “posed” photographs. Also remember to have spare batteries with you or if using a phone have it charged.
Get outside. The best time to take photographs in natural light is in the morning and evening. They call these times the “magic hours”. Once you start taking photographs during this time you will never take a photo again at 12:00 noon.
Put the sun at your back. This is a general rule, that can certainly be broken, but until you know how to shoot into the sun your photographs will be much better if you are between the subject and the sun. Vary the angle to the sun,especially for people, and you will be amazed at the results. Remember experiment and try different angles. This is digital.
Be vicious with what you save. If you’re going to be taking a lot of photographs your computer can fill up very fast with images. Take the time now to keep only the very best. You will be so thankful for the time spent now rather then having to plow through hundreds of images in the future. Next lession we will talk about organizing you photos. Boring, maybe, but absolutely necessary to keep from being really bored in the future.
Monday, March 24, 2014
Hints on taking better photographs
I am going to begin a sessions on learning to take better photographs. Everyone these days has great cameras, even on their phones. But a great camera does not mean great photography. So little by little I'll be including some hints on this blog.
Number 1.
Read the camera manual. People don't do this and they miss so much. Learn the basic actions, such as using the flash (on, off, and auto), zooming in and out, and using the shutter button. Some cameras come with a printed beginners manual but also offer a free larger manual on the manufacturer's website. If you don't have a camera manual just go on line and you'll find instructions.
Number 2.
Set the camera's resolution to take high quality photos at the highest resolution possible. Low-resolution images are more difficult to alter later; it also means that you cannot crop as enthusiastically as you could with a higher-resolution version (and still end with something printable). Upgrade to a bigger memory card. If you don't want to or can't afford to buy a new one, then use the "fine" quality setting, if your camera has one, with a smaller resolution.
Number 3.
Start with setting your camera to one of its automatic modes, if you have a choice. Most useful is "Program" or "P" mode on digital SLRs. Ignore advice to the contrary which suggests that you operate your camera fully manually; the advances in the last fifty years in automatic focusing and metering have not happened for nothing. If your photos come out poorly focused or poorly exposed, then start operating certain functions manually.
That's enough for today. Just these 3 hints will have you taking much better photographs and having more fun. Stay tuned for more.
Thursday, March 20, 2014
Hiring a professional for your photography
Since everyone these days has a good or great camera people seem to think they can leave the photography to a friend or relative. I hear these sad stories afterward when they hire me to actually get some "good" photos but of course the wedding is over. Here is a quote from a fellow wedding professional photographer.
Surrendering to the unskilled is killing the wedding industry and robbing the couple of what they want. Sadly, the bride and groom are surrendering to unprofessional photographers and ending up with photos that carry no emotion or story telling. True, brides want 1500 images, but they lack the knowledge of what they are actually getting until that CD is actually viewed-many duplicate images using the "burst camera function." And editing either on her computer or online soon turns into hard work soon to be put off until a very raining day or never at all.
You are not hiring the equipment when you hire a professional wedding photographer you are hiring someones' skills. It does take years of experience to be able to anticipate those unforgettable moments. Plus when you have a friend or relative do the photography they are going to want to party as well thus leaving those moments unrecorded. Skimp on the fancy cake or get less expensive flowers. Instead hire the professional photographer so you will have your memories forever.
www.charlottebell.com
Friday, March 14, 2014
Mexcio for a Honeymoon?
Yes, most of Mexico is safe especially the beautiful colonial cites like San Miguel de Allende. Talk about a back drop for gorgeous photography!! I have photographed many weddings there, all with spectacular results. Here is a sample of one of the weddings. http://charlottebell.com/san-miguel-de-allende-wedding/ Flowers are less expensive, the service is unbeatable, the food is delicious plus there are wedding planners I will put you in contact with that can take care of all the details at a fraction of the cost then the US. And usually the wedding ends with fireworks, like in the sample. Let me know if you have any questions or would like to see more photographs from the fabulous destination wedding site.
Subscribe to:
Posts (Atom)